Article ID: 2024801 Last Updated: 20 July 2023
Before starting, please check that your network and all intended AccountEdge NE computers meet the system requirements.
If you have not already done so, install AccountEdge NE onto the host computer. The host computer is the computer from which you wish to share your AccountEdge company file(s). This does not have to be a full Mac Server but does require macOS. Check the system requirements for more information.
AccountEdge NE can be downloaded here.
Note: Whilst AccountEdge NE must be installed on the host computer, it does not need to be registered unless it is also used as an AccountEdge NE workstation in its own right.
FileConnect is a background service that shares AccountEdge NE data across the network. FileConnect is only required on the host computer.
To install FileConnect, start AccountEdge NE. From the Welcome window select Company File Maintenance> Download FileConnect.
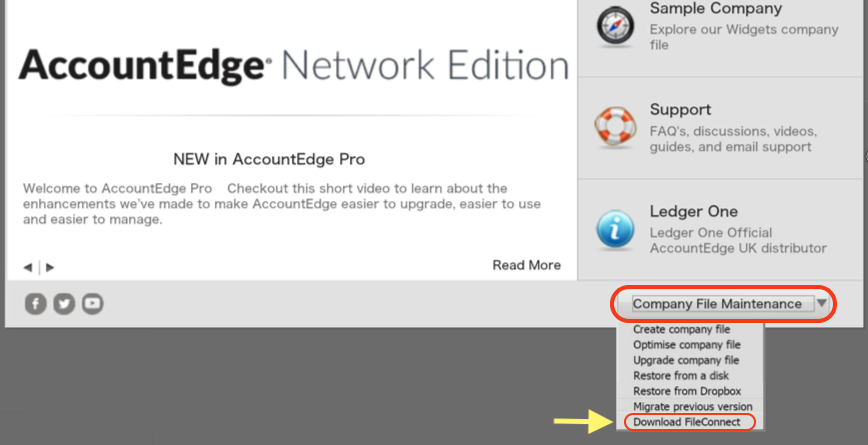
Your internet browser will download FileConnect into your Downloads folder.
Use Finder to view your Downloads folder and double-click the FileConnect_GB installer.
Follow the installation and restart your host computer when prompted.
After restarting your host computer, go to the Apple button> System Preferences> AccountEdge.
The AccountEdge system preferences will appear:

Click Start FileConnect and enter your computer's administrator password, if prompted.
You are now sharing the company files hosted on this computer.
Close the window.
If you are upgrading from a previous version of AccountEdge (for example 2018 to 2023), please follow Step 5 - Upgrading Your Company File, found in the AccountEdge Plus NE Upgrade Guide.
If no company file upgrade is required, move on to the next step.
Place your .myo company file(s) in the following folder on the host computer (mandatory location):
[Macintosh HD] / Library / Application Support / AccountEdge NE / Databases
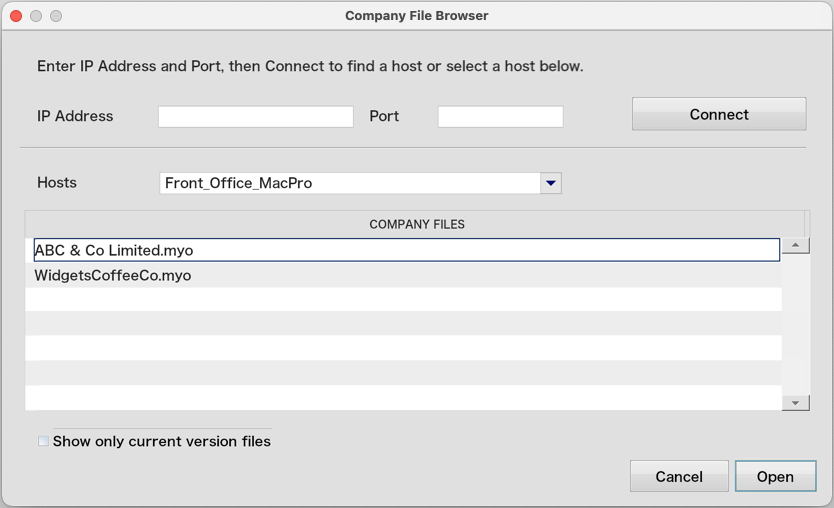
Start AccountEdge NE and use the Browse option to select your host computer and open your company file. Example below:
If you have not already done so, install AccountEdge NE onto the additional workstations on your network.
FileConnect is not required on worksation computers.
Start AccountEdge NE and use the Browse option to select your host computer and open your company file.
AccountEdge NE forms 'live', continuous connections between the host computer and workstations. You should not allow the host computer or workstations to go into sleep mode while active company files are being used.
Follow the steps below to prevent a computer from going to sleep.
If you are using third party backup software or routines to backup your host computer (which we strongly recommend), ensure that you include the AccountEdge NE databases folder in the backup:
[Macintosh HD] \ Library \ Application Support \ AccountEdge NE \ Databases
If you have not already done so, you will need to create User ID's in each company file for the users who require access to the respective company files.
To create User ID's in a company, login to the company file as Administrator and go to Setup> Preferences> Security, then click the User IDs button.
We do not recommend running AccountEdge NE across a wireless network. Wireless networks are not included in the minimum system requirements. AccountEdge NE performance can be severely decreased using wireless connections.
AccountEdge NE is designed to be run on a fully ethernet cabled Local Area Network (LAN), in one location/site. AccountEdge NE is not supported across Wide Area Networks (WANs) or Virtual Private Networks (VPNs).
Some customers wishing to use AccountEdge NE from different locations do so by using a remote desktop application to remotely view the desktop of a computer that is physically located on the main office LAN.
For example, doing this with a 2 user setup would require 3 computers:
Computer A: Location: Office. The AccountEdge NE host computer, which stores the company file and shares the data across the network. This computer can be used as an AccountEdge NE workstation.
Computer B: Location: Office. An AccountEdge NE workstation, directly connected to the LAN via an ethernet cable. This computer will not be used by anyone in the office. Instead, it will have a remote application running, which will allow the user of Computer C to use Computer B, just as if they were sitting in the office.
Computer C: Location: Anywhere. A remote computer of any kind (Mac or PC) that also runs the same remote software as Computer B. The user of Computer C remotely logs into Computer B’s desktop and uses it as if they were sitting in the main office. Computer C does not require any AccountEdge software to be installed; the user will be remotely using Computer B’s AccountEdge NE application.
For more detailed information about the setup of your network and the implementation of AccountEdge Plus NE, we recommend you refer to the AccountEdge NE Implementation Guide.
Note: This support note contains information is of a generic nature. For specific advice regarding your particular circumstances please seek assistance from your IT administrator or consultant as appropriate.